In this article you will see step by step how to connect SQL Server Management Studio to an Azure SQL database.
Prerequisites
- An Azure SQL database has already been created.
- SQL management studio is already installed.
You can get the latest version here which also includes Azure Data Studio from Microsoft:
https://learn.microsoft.com/en-us/sql/ssms/download-sql-server-management-studio-ssms
If you do need an older version, you can find the builds here:
https://learn.microsoft.com/en-us/sql/ssms/release-notes-ssms?view=sql-server-ver16#previous-ssms-releases
For this guide I am using SQL Server Management Studio (SSMS) Release 18.12.1
Connecting SQL Server Management Studio to Azure SQL
Collect Connection Information
First thing we need is the connection information.
You will be looking to find the fully qualified server or hostname, database name, and you should have the login details.
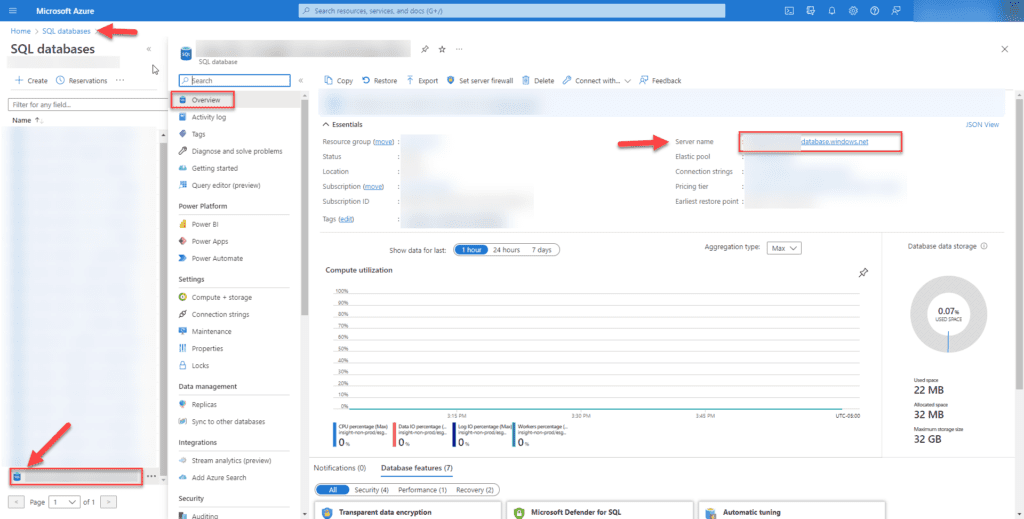
Go to your Azure portal and sign in.
Next search for SQL databases, and go to the database you are connecting to.
In the overview page, you will find the server name. Copy the entire fully qualified name. It should look something like this…<servername>.database.windows.net

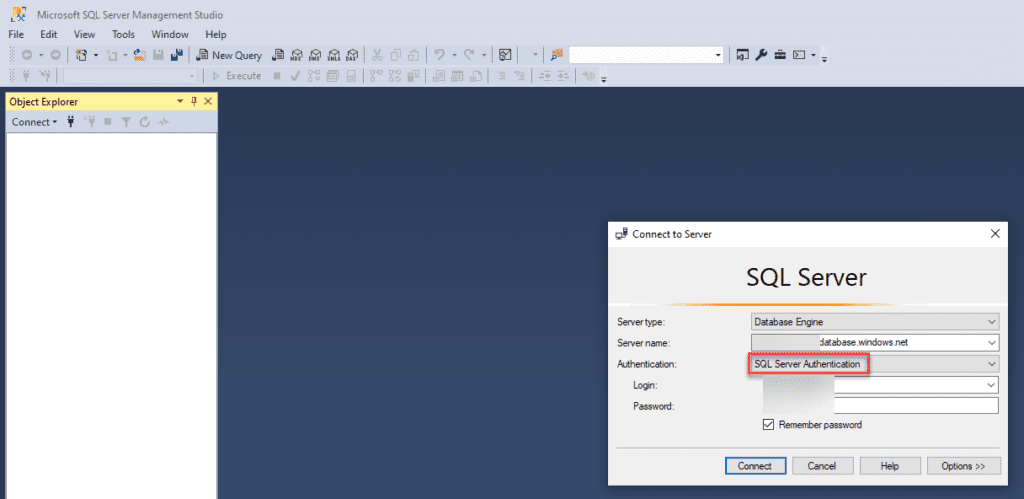
Now open SQL Server Management Studio and enter the server name to connect to the database engine.

- Server type will default to Database Engine. No action required.
- Paste or type the server name you just copied from the portal into the server name field.
- Change the authentication to SQL Server Authentication
- Enter your login credentials and click Connect
Troubleshooting
***IMPORTANT***
Port 1433 has to be open to establish connectivity with the server. If you are connecting from behind a corporate/business firewall you must have it open to make the connection.
Also if Azure is not set to accept connections from you current connection, it may prompt for a new firewall rule to be created in Azure. You can have it add a rule for your current public IP address (if it is static) or the IP address range you are connecting from (this option is when you have an ISP that provides DHCP addressing and your public IP address changes upon router reboots or on IP address lease renewals). You must have permissions in Azure to apply the rule or else the prompt will fail and you will not be able to connect. At that point you will want to reach out to your Azure Admin and pass a screenshot of the new firewall rule dialog box to help in making the changes.
These firewall rules are set in Azure by going to the SQL Server >Browse to Security in the left tree>Select Networking

- Check to make sure you have the ports open to connect
- Make sure Azure knows to allow where you are connecting from
- Verify that you are using the fully qualified name of the server
- Ensure you are using SQL Authentication and that the correct username and password are being used.
Once connectivity is established and the correct credentials are verified you will be connected to your SQL database instance!


Recent Comments